Items Configuration
The item system uses Constants to ensure all names match across every script. This also enables Auto-completion in your IDE (like Roblox Studio or VS Code): as soon as you start typing, the editor will suggest the item name, preventing typos.
1. Define Item Names
First, you must register your item names in the ItemsConstant module.
Path: ReplicatedStorage > Shared > Constants > ItemsConstant
Example:
NAME = {
    ITEM_A = "Item A",
    ITEM_B = "Item B",
    ITEM_C = "Item C",
}
2. Configure Item Stats
Next, add the item data into the ItemsConfig module. Use the constant you just created as the key.
Path: ReplicatedStorage > Shared > Config > ItemsConfig
Example:
module.Items = {
    [ItemsConstant.NAME.ITEM_A] = {
        Income = 10, -- Amount generated per second
        Rarity = ItemsConstant.RARITY.UNCOMMON,

        IndexHidden = true, -- Optional: Set to true to hide from the Index UI
    },
}
3. Setup Models & Mutations
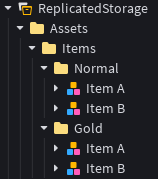
Place your models inside the Items folder.
Path: ReplicatedStorage > Assets > Items
- Name: The name of your model must match the string value (the text in quotes). For example, if your constant is
ITEM_A = "ITEM A", you must name your model "ITEM A" and NOT "ITEM_A". - Mutations: You must have a model created for each mutation. Place your models into the folder corresponding to their mutation type. You can also create your own mutations. (See Mutation Configuration for more details).
Model Orientation
Make sure the orientation of your model is correct.
Tip
Using constants means you don't have to remember every item name. Just type ItemsConstant.NAME. and let the IDE show you the list!
Next Steps
After adding your items, you must configure their chance so players can actually obtain them in dice